Friday, November 12, 2010

ok ok ok...one more thing....

we had one more project to do and decided to call in a specialist to get it done.  the mission: to create a bar in the dining room [no, we're not drunks, just thirsty]

we needed a contractor to create a custom built-in cabinet who would:
- work long days [and into the night]
- for a discount price [maybe even free]
- to get the project done in 6 days [did i mention it was custom?]
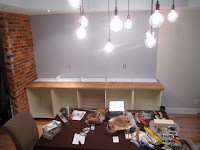


so we flew Jenny's Dad in from LA for a week.

John is a self-taught carpenter/electrician/plumber who was more than game to lend a hand in building the cabinetry.  We agreed upfront that its a "team" thing and we're all going to put in work to make it.  and we all did.  but SOMEHOW he ended up doing most of it ;-)

we saw these built-in cabinets at a friends' house recently and decided to cop their style.  its simple & bold and practical....we just needed to know how to make it.

so we sent John a picture.  and a diagram of what we wanted.  he diagnosed it and sent over an extensive home depot shopping list:  Large sheets of Poplar wood.  Long pieces of galvanized steel pipe.  biscuits {what the hell are those?} dowels.  and glue.  LOTS of glue.

we saved some time in the process by buying the lower cabinets from IKEA.  we liked the stainless steel door fronts and the fact that they didnt have to be built from scratch [though sometimes it feels that way with IKEA shit]  we also got the countertop from IKEA, though it came in two separate pieces that had to be cut & joined together [break out the biscuits!]

once the cabinets were anchored to the wall and the top was set, we began to build the open wood shelving that was to sit above it.

on its face: pretty easy, right?  measure some shit.  cut some shit.  glue some shit.  paint some shit.  done.

ummm....yeah.  notsomuch.

first of all, when you really examine a house, any house, you will see things that are not what you thought they were.  as in: its hard to build a cabinet flush to the wall when the wall isnt straight to begin with.  not to alarm you, but thats just the way it is just about everywhere.  and its only off by fractions of an inch.  but over a 10+ foot section of wood, that makes a big difference.

the shelving was to be built in two pieces: the interior/cubbyholes were first.  the "face" frame was second.

i'll skip the boring details on all the measuring, cutting, re-measuring and re-cutting we did, but somehow, miraculously, we were able to chop down all the large pieces of Poplar into sections that were glued together one at a time.


[How John was able to run all that wood through the table saw without chopping his fingers off, I'll never know.]

all the sections were held together by large metal clamps that John sent our way the week before [they were the key to the process....and the biscuits, too]


once the backside was built, we began the same process with the "face" frame and then fit it all together


then, all of a sudden, we were in a good place.  we painted all the shelving with a few good coats of semi-gloss white and let it dry for the night. so we decided to let our hair down for the night and head out for a much needed break before the final stage of the work.  it just so happened to be halloween, and as you can see, we had a good time.


the last stage was to fit the face frame on the cubbyholes.  we rented a nail gun from home depot for the occasion.  we actually rented alot of stuff from home depot.  some which were real rentals, and some items that we returned after we realized that we didnt need to keep them forever {"SHHHHHH"}

after some spackle and touch-up paint, it was done!

5.5 days.  200+ man-hours.  1 case of beer. and 48 biscuits later.....we had ourselves a built-in.  and a damn good-looking one too.

after John caught his 1st class SouthWest Airlines seat back to LA, Jenny and I finished up adding the cabinet doors, molding, and wine racks to finish the installation.  the wine refrigerator arrived a couple days later and that officially completed the project.

now all we need to do is stock the bar.  No help needed on that front...I think we can take things from here....but a HUGE thanks to John for making this happen.  We owe you a cold one [and maybe a little bit more]

Tuesday, November 9, 2010

Thoughts from the rear-view mirror [part I]

so, we've reached the end of the line with the contractor....his work is done [save for some odds and ends that will pop up in the the first year]  and he's been paid.  we definitely got the most value for the dollar in the deal....we worked closely with the crew to upgrade a bunch of things along the way [bathrooms, kitchens, lighting] and used every nook and cranny inside of this 110yr old house to create 3 bedrooms, 2.5 bathrooms, a hi-end kitchen, rear deck, a good amount of storage, and a fully separate basement rental unit.  We're really pleased with how it all turned out.

in the end, though the process took about 40% longer than expected [thanks to the bank, the city, and to a lesser extent, the contractor],

and cost about 20% more than quoted [thanks also to the city and in a large part US]

but it was 100% worth it.

the real estate junkies around here can tell you what a victorian rowhouse goes for in DC in ANY condition....its not cheap, and depending on where its located, could sink your budget before any work is done.

but if you DO find a good deal on the "shell" [or similar] you'll need to get a plan together for fixing it up and making it yours.  in our case, we were able to live in a comfortable spot away from the construction mess the entire time and visit the site daily to check on progress...and we didnt move-in until everything was [almost] all done...this is called a "civilized renovation" [and its what keeps relationships intact]

other circumstances dont allow for that.  some people have different timelines and budgets that force the issue of the move-in date.  so you'll need to live amongst the dust/debris/disarry.  an extreme example:  our neighbor across the street has been in the middle of a renovation for 2.5 years and has spent cold winters with only a small space heater to keep him from freezing.

overall, renovating a house from tip to tail in 9 months is actually very fast for a first-timer, residential homeowner who doesn't have a frikkin clue as to what they are doing.  And now that the smoke has finally cleared and we're actually living there FOR REALZ--- I'm just starting to realize that.

would I recommend this to anybody else?  yes.  but with a KAJILLION caveats.
[perhaps i'll list them in a later post]

and perhaps a mental health evaluation.  you gotta have your mind right.  its not for the faint of heart.

beer helps too.

but if you get through it, it'll be a good feeling...a damn good feeling. to have a place to truly call your own.

Monday, November 8, 2010

The Grand Opening

well....I can finally say that we're "done"

though you're never really done...we've gotten rid of all the dust and cleaned the joint up enough to make it presentable

so now its time for you to come and check us out.

date: 11/20
time: 4pm until
email me at: terrance3000@gmail.com for the rest of the details


til then...


-TG

Wednesday, October 20, 2010

Green Thumbs

1 Saturday.   11 hours.  and a dream.....

thats what it took for our front yard [aka: the warzone] to get an extreme makeover

mind you, its only a 12ft x 12ft spit of dirt [if that]...but it sure had alot of goodies hidden in the dirt.

old bricks.  concrete chunks.  scrap metal.  and LOTS of oyster shells [you got me on that one]

we started with the idea of just turning over the soil and planting some greenery that could make it through the fall & winter.   then spread some much around to cover it up.   no grand plans, just a desire to get rid of that nasty dirt patch in front of the classy new joint.

but its never that easy is it?

in the end, we...

 - shoveled about 1000 pounds of dirt.  
 - excavated 200lbs of bricks and various debris
 - removed several iron bars embedded over a foot into the ground
 - transported 300lbs of new stone and concrete from home depot [where else]
 - constructed a trash can "pad"
 - built a retaining wall
 - dropped in 8 hearty plants for the winter and a couple dozen dutch tulips that may or may not grow [thanks either way Elizabeth!]


I think that you can see by the before and after pics, it was some overdue work, but I'm looking forward to no more Saturdays like this

more pics here

Thursday, September 30, 2010

Settling in....

so, we've finally moved in!  crazy.  really crazy.  its kind of hard to believe b/c when i take a look around I can still see each corner of the place in its former condition as clear as day:  the moldy carpet.  the massive holes in the rotted floors.  the bombed-out kitchen.  the NASTY basement.

but now its all transformed.  and it looks damn good [if I do say so myself]

the last couple of weeks, have been as intense/busy as any other during the process because you just want to start LIVING.  get that sock drawer going.  where do the spatulas go?  have we tried the dishwasher yet? where's the TP?

all ho-hum decisions, but they are the ones that you have to make so you can continue the "settling in"

I'm looking forward to the weekend when we can kick the feet up on the couch and just chiiiiill.  maybe watch the Jets march on their road to the Super Bowl.  I'm aiming for week 11 [lets hope we're still in it]

here's some pics from recent weeks, its not quite ready for "the big reveal" but I'll keep posting stuff up until then

Thursday, September 16, 2010

Gluttons for Punishment

an old house has so many charming things in it that can be salvaged.  a door.  a window or its frame.  fireplace mantels.  We've actually been able to salvage all of the above and its works pretty well with all the "new" around it

the last item up on the salvage list was a old radiator.

originally, the plan was to salvage 3 of the 6 old radiators in the house.  now, the dont work anymore [they cracked on the inside] but they look really cool and I wanted to keep that flavor around

*notice I didnt say "we" on this one...because this was definitely an "I" thing ;-)

as time went by and we saw how hard it was to strip those old doors, the goal went down to two radiators....then just one.   [someone was getting their way....hmmmmm]

so we/I went ahead with stripping the thick layers of lead paint off of the old radiator.

we found that it was about 100x harder than the doors.  You see, radiators have a ton of nooks and crannies that you just cant get to [at least not easily]

and did i mention that it was heavy?  yeah.  like 450 pounds worth of heavy.  every time we moved it our lives [and toes] were in danger.

the chemical stripper wasnt working, so we switched to a manual method [which proved to be the breakthrough moment]: a heavy wire brush on the end of a high powered drill!   it was, at the very least, a much more manly way to take paint off a heavy metal object [no disrespect to our stripping fluid with the fresh citrus scent]

so after 2 weekends [spaced about 2 months apart] we finally finished the radiator.  and it looks great.  the old details really came out once the power drill method got going.

next came a fresh coat of metallic spray paint and then creating a "platform" for the radiator to sit on from one of the original old wood joists.  [more salvaged material!]

take a look at the finished work here

Wednesday, September 15, 2010

Full Circle

this past weekend, I had an unexpected meeting...and it was kind of cool.

A car pulled up in front of the house and stopped to look.  I didn't think much of it, but after a minute or two, I decided to go out and  see if I could help the onlookers.

There were two people in the car...a man and a woman.  The woman asks "do you live here?"  I told her that we had just moved in.  She immediately responded: "I used to live there!!"

She stepped out of the car and introduced herself...Portia was the name.  Her husband was Andrew.

They were very excited about seeing the place back in action.  Knowing that the house was vacant for the last 15 years, I asked when she last lived here...

her reply: "1996"

she went on to tell me that she lived there for about 18 years, moving in around 1978.  There were 7 kids raised by a single mom that lived there over time.  And the place was falling apart slowly even as they lived there.  By the time they rolled out in '96, the roof was leaking, the carpet stank, and the place was lookin pretty ragged.

sounded kind of like they way I saw it the first time [about a year ago]..just as 15 years of neglect and squatting!

they asked if I could take them on a tour of the renovation.  I said "of course"

I showed them all the new things that we did with the place and you could see that they were just floored.  It shocked them that this place could shine again.

Portia recalled which room the boys stayed in and which one was for the girls.  they had only one bathroom for the whole family.  and the rooms were small. But, as many families do, they make a way.

and so it comes full circle.  The current resident meets the last resident of the house..albeit almost 2 decades apart.   Pretty cool.